零知开源小项目-超声波雷达 HC-SR04
本次的趣味项目结合舵机、超声波模块并配合上位机Processing制作超声波雷达效果。
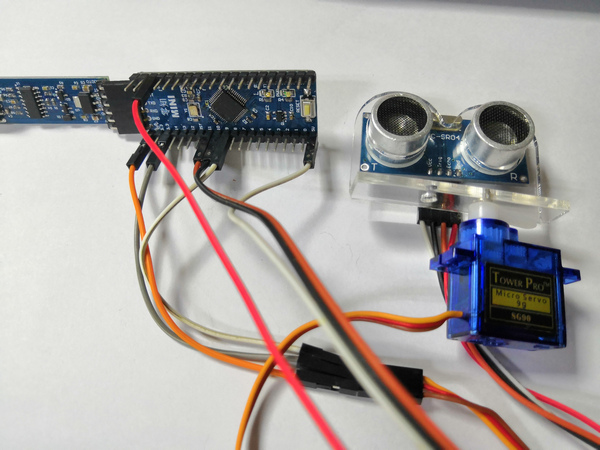
1、硬件连接
超声波支架:
连线

2、程序
零知迷你板软件代码:
/**********************************************************
* 文件: 超声雷达.ino by 零知实验室([url=http://www.lingzhilab.com]www.lingzhilab.com[/url])
* -^^- 零知开源,让电子制作变得更简单! -^^-
* 时间: 2019/05/07 09:56
* 说明: 超声测距,把数据传输到processing后,达到雷达的视觉效果
************************************************************/
#include <Servo.h>
//舵机连接的引脚
const int servoPin = 9;
// 超声模块的引脚
const int trigPin = 10;
const int echoPin = 11;
//间隔时间和距离
long duration;
int distance;
Servo myServo; //舵机
// 复位或上电后运行一次:
void setup() {
//在这里加入初始化相关代码,只运行一次:
//设置超声模块连接的引脚
pinMode(trigPin, OUTPUT);
pinMode(echoPin, INPUT);
Serial.begin(9600);
//连接舵机的引脚
myServo.attach(servoPin);
}
//一直循环执行:
void loop() {
// 在这里加入主要程序代码,重复执行:
//舵机运转角度范围: 15 - 165 度
for(int i=15;i<=165;i++){
myServo.write(i);
delay(30);
//测量距离
distance = calculateDistance();
Serial.print(i); // 发送角度数据
Serial.print(","); // 发送分隔符作为数据之间分隔,在processing中就根据这个处理数据
Serial.print(distance); // 发送距离数据
Serial.print(";"); // 发送一个结束符号,在processing中接收到这个符号后标识本次数据包完成
}
//舵机运转角度范围: 165 - 15 度
for(int i=165;i>15;i--){
myServo.write(i);
delay(30);
distance = calculateDistance();
Serial.print(i);
Serial.print(",");
Serial.print(distance);
Serial.print(";");
}
}
//超声测距的函数
int calculateDistance(){
digitalWrite(trigPin, LOW);
delayMicroseconds(2);
// Sets the trigPin on HIGH state for 10 micro seconds
digitalWrite(trigPin, HIGH);
delayMicroseconds(10);
digitalWrite(trigPin, LOW);
// Reads the echoPin, returns the sound wave travel time in microseconds
duration = pulseIn(echoPin, HIGH);
distance= duration*0.034/2;
return distance;
}
(2)Processing端的代码:
import processing.serial.*; // 串口软件库
import java.awt.event.KeyEvent;
import java.io.IOException;
Serial myPort; // 串口实例
//变量定义
String angle="";
String distance="";
String data="";
String noObject;
float pixsDistance;
int iAngle, iDistance;
int index1=0;
int index2=0;
PFont orcFont;
void setup() {
size (1200, 700); //窗口大小
smooth();
myPort = new Serial(this, "COM24", 9600); // 这里要写上你自己的串口号
myPort.bufferUntil(';'); //读取到本次数据的结束符
}
void draw() {
fill(98, 245, 31);
// simulating motion blur and slow fade of the moving line
noStroke();
fill(0, 4);
rect(0, 0, width, height-height*0.065);
fill(98, 245, 31); // 设置颜色为绿色
// calls the functions for drawing the radar
drawRadar();
drawLine();
drawObject();
drawText();
//stroke(0,0,244);
fill(0, 0, 244);
textSize(34);
text("超声雷达演示", 20, 60);
}
void serialEvent (Serial myPort) { // 从串口读取数据
//读取到本次数据的结束符,标识";"
data = myPort.readStringUntil(';');
data = data.substring(0, data.length()-1);
index1 = data.indexOf(","); // 分隔符,作为角度和距离数据的分隔
angle= data.substring(0, index1); // 获取到角度数据
distance= data.substring(index1+1, data.length()); // 获取到距离数据
// 转换为整型数值
iAngle = int(angle);
iDistance = int(distance);
}
void drawRadar() {
pushMatrix();
translate(width/2, height-height*0.074); // moves the starting coordinats to new location
noFill();
strokeWeight(2);
stroke(98, 245, 31);
// draws the arc lines
arc(0, 0, (width-width*0.0625), (width-width*0.0625), PI, TWO_PI);
arc(0, 0, (width-width*0.27), (width-width*0.27), PI, TWO_PI);
arc(0, 0, (width-width*0.479), (width-width*0.479), PI, TWO_PI);
arc(0, 0, (width-width*0.687), (width-width*0.687), PI, TWO_PI);
// draws the angle lines
line(-width/2, 0, width/2, 0);
line(0, 0, (-width/2)*cos(radians(30)), (-width/2)*sin(radians(30)));
line(0, 0, (-width/2)*cos(radians(60)), (-width/2)*sin(radians(60)));
line(0, 0, (-width/2)*cos(radians(90)), (-width/2)*sin(radians(90)));
line(0, 0, (-width/2)*cos(radians(120)), (-width/2)*sin(radians(120)));
line(0, 0, (-width/2)*cos(radians(150)), (-width/2)*sin(radians(150)));
line((-width/2)*cos(radians(30)), 0, width/2, 0);
popMatrix();
}
void drawObject() {
pushMatrix();
translate(width/2, height-height*0.074); // moves the starting coordinats to new location
strokeWeight(9);
stroke(255, 10, 10); // red color
pixsDistance = iDistance*((height-height*0.1666)*0.025); // covers the distance from the sensor from cm to pixels
// limiting the range to 40 cms
if (iDistance<40) {
// draws the object according to the angle and the distance
line(pixsDistance*cos(radians(iAngle)), -pixsDistance*sin(radians(iAngle)), (width-width*0.505)*cos(radians(iAngle)), -(width-width*0.505)*sin(radians(iAngle)));
}
popMatrix();
}
void drawLine() {
pushMatrix();
strokeWeight(9);
stroke(30, 250, 60);
translate(width/2, height-height*0.074); // moves the starting coordinats to new location
line(0, 0, (height-height*0.12)*cos(radians(iAngle)), -(height-height*0.12)*sin(radians(iAngle))); // draws the line according to the angle
popMatrix();
}
void drawText() { // 绘制界面上的文字
pushMatrix();
if (iDistance>40) {
noObject = "超出范围";
} else {
noObject = "在此范围";
}
fill(0, 0, 0);
noStroke();
rect(0, height-height*0.0648, width, height);
fill(98, 245, 31);
textSize(25);
text("10cm", width-width*0.3854, height-height*0.0833);
text("20cm", width-width*0.281, height-height*0.0833);
text("30cm", width-width*0.177, height-height*0.0833);
text("40cm", width-width*0.0729, height-height*0.0833);
fill(45, 145, 245);
PFont myFont = createFont("宋体", 34);
textFont(myFont);
textSize(34);
text("目标:"+noObject, 0, height-height*0.0277);
text("角度:" + iAngle +" °", width*0.36, height-height*0.0277);
text("距离:", width*0.53, height-height*0.0277);
if (iDistance<40) {
text(iDistance +" cm", width*0.60, height-height*0.0277);
}
fill(145, 45, 245);
text("by 零知实验室.", width*0.80, height-height*0.0277);
textSize(25);
fill(98, 245, 60);
translate((width-width*0.4994)+width/2*cos(radians(30)), (height-height*0.0907)-width/2*sin(radians(30)));
rotate(-radians(-60));
text("30°", 0, 0);
resetMatrix();
translate((width-width*0.503)+width/2*cos(radians(60)), (height-height*0.0888)-width/2*sin(radians(60)));
rotate(-radians(-30));
text("60°", 0, 0);
resetMatrix();
translate((width-width*0.507)+width/2*cos(radians(90)), (height-height*0.0833)-width/2*sin(radians(90)));
rotate(radians(0));
text("90°", 0, 0);
resetMatrix();
translate(width-width*0.513+width/2*cos(radians(120)), (height-height*0.07129)-width/2*sin(radians(120)));
rotate(radians(-30));
text("120°", 0, 0);
resetMatrix();
translate((width-width*0.5104)+width/2*cos(radians(150)), (height-height*0.0574)-width/2*sin(radians(150)));
rotate(radians(-60));
text("150°", 0, 0);
popMatrix();
}
注:上面需要根据自己板子的串口号改成自己的。
测试验证
零知迷你板接好线并上传好代码后,打开Processing,并修改自己的串口号,然后运行,就可以看到类似雷达扫描的效果了:
