ESP8266与零知板使用SPI接口连接 提高传输速率
我们在使用ESP8266模块的时候,大多数情况下使用时串口连接,这对于少量数据传输情况下比较方便,特别是对于AT指令使用非常方便,但是在传输数据量较大的情况下,使用串口就大大限制了传输速率,也使得8266模块没有发挥其强大的WIFI大量数据传输的功能;下面在零知-增强板上介绍使用SPI接口连接ESP8266模块,加快数据传输速率。
一、硬件连接:
硬件上只需要把零知增强板的SPI接口和WIFI模块的SPI接口对应连接即可,当然这里实际上是8266的HSPI引脚,连接方式比较简单:
当然还需要连接电源和地引脚到零知板的3.3和GND上。这里为了方便使用的是NodeMCU板,你也可以使用其他带SPI接口的esp8266模块: https://item.taobao.com/item.htm?spm=a1z10.3-c.w4002-18402505252.67.62be3002BF8RUf&id=569486006328
二、软件代码编写
2、我们要使用SPI的方式进行通信,那么ESP8266模块和零知板都需要相应SPI相关代码,这里为了简便就直接使用相关的库进行操作了。
(1)ESP8266端代码WiFiSpiESP.7z(点击下载)
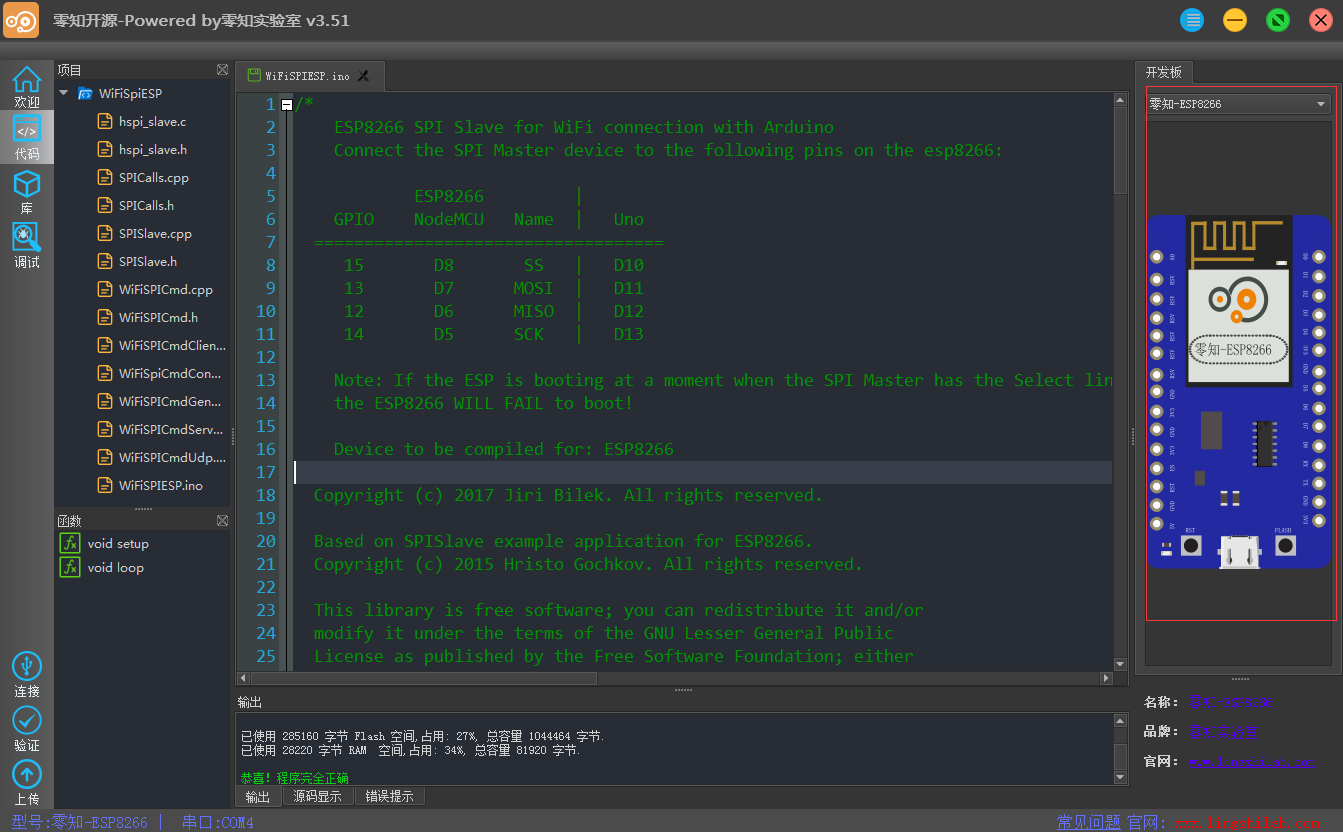
零知增强板端代码编写
WiFiSpi.7z(点击下载)
首先下载这个库,并放置到零知平台对应软件库目录下,然后编写如下程序:
/*
WiFiSPI example: esp8266连接AP,UDP传输数据
电路连接:
1. On ESP8266 must be running (flashed) WiFiSPIESP application.
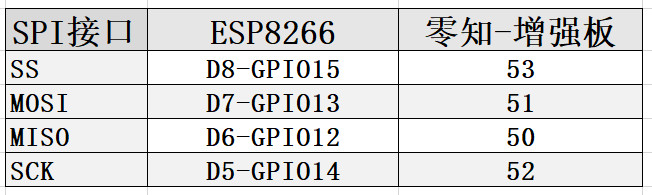
2. Connect the Arduino to the following pins on the esp8266:
ESP8266 |
GPIO NodeMCU Name | Lingzhi Enhanced Board
===================================
15 D8 SS | 53
13 D7 MOSI | 51
12 D6 MISO | 50
14 D5 SCK | 52
*/
#include "WiFiSpi.h"
#include "WiFiSpiUdp.h"
//热点名称
char ssid[] = "lingzhilab";
char pass[] = "lingzhilab.com";
unsigned int localPort = 8081;
char udpServerIP[] = "192.168.0.122";
int serverPort = 8081;
#define PACKET_SIZE 256
byte packetBuffer[PACKET_SIZE];
const int UDP_TIMEOUT = 2000;
WiFiSpiUdp udpClient;
void setup()
{
// initialize serial for debugging
Serial.begin(9600);
// initialize the ESP module
WiFiSpi.init();
// 检查是否连接了运行SPIWifi程序的8266模块
if (WiFiSpi.status() == WL_NO_SHIELD) {
Serial.println("WiFi shield not present");
// don't continue
while (true);
}
int status = WL_IDLE_STATUS;
// attempt to connect to WiFi network
while (status != WL_CONNECTED) {
Serial.print("Attempting to connect to WPA SSID: ");
Serial.println(ssid);
// Connect to WPA/WPA2 network
status = WiFiSpi.begin(ssid, pass);
}
// you're connected now, so print out the data
Serial.println("You're connected to the network");
udpClient.begin(localPort);
}
void loop()
{
sendPacket(udpServerIP); // send an packet to server
// wait for a reply for UDP_TIMEOUT miliseconds
unsigned long startMs = millis();
while (!udpClient.parsePacket() && (millis() - startMs) < UDP_TIMEOUT) {}
// when there should be a packet do not call parsePacket() once more, call available() instead
if (udpClient.available()) {
Serial.println("packet received:");
// We've received a packet, read the data from it into the buffer
udpClient.read(packetBuffer, PACKET_SIZE);
Serial.println((char*)packetBuffer);
Serial.println();
}
// wait ten seconds before asking for the time again
delay(1000);
}
// send an packet to server
void sendPacket(char *server)
{
// set all bytes in the buffer to 0
memset(packetBuffer, 0, PACKET_SIZE);
strcpy((char*)packetBuffer, "message from UDP client\r\n");
udpClient.beginPacket(server, serverPort);
udpClient.write(packetBuffer, PACKET_SIZE);
udpClient.endPacket();
}
上面的代码需要更改为自己的wifi名称和密码,并更改在第三步得到的UDP server的IP地址,验证完成后下载到零知-增强板。
完整代码工程:
esp8266-wifispi.7z(点击下载)
三、测试验证
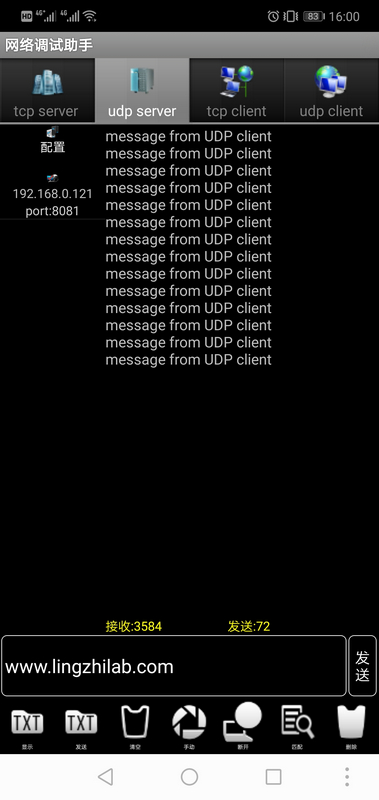
我们下载好所有的代码并连接好硬件后,首先在手机上连接同一个Wifi,如上面的“lingzhilab”,然后打开网络调试助手工具,并开启UDP-Server模式,填写上面代码中一样的端口号8081,这里会分配到一个服务端地址,这个地址就需要填写到上面的
char udpServerIP[] = "192.168.0.122";
上面准备工作完成后,我们就可以看到在手机网络调试助手上接收到从零知板发来的信息,同时也可以发送信息给零知板,如下:
手机端网络调试助手接收到信息:
零知板接收到手机端发送来的信息:
